Thus, without a highly organized presentation folder, Marilyn would never have had a chance against her landlord, who had won previous lawsuits against his former tenants. I can’t stress enough the importance of being organized, and in fact, being organized in a certain order. Judges don’t want to spend time trying to figure out your evidence. You must “spoon feed” the judge and make it absolutely as simple as possible for him to clearly see that the landlord violated your rights as a tenant and that the landlord’s claims are fabricated. A properly organized presentation folder will do that.
Some judges are more left-brained, some judges are more right-brained. Left-brained judges begin at the beginning and continue through until the end. Right-brained judges skip around a lot and may begin somewhere in the middle. It’s important that your evidence is organized for both types of people, since your judge may not look at your presentation folder in order, or even review all of it, for that matter. Therefore, the order in which you put every piece of evidence is for the left-brained judges, and the cross-references which you add to each piece of evidence are for the right-brained judges. That’s how I organized our presentation folder.
First, let’s start with your organizational materials, which can be found at office supply stores (remember, buy two of everything!):
· Binder, probably one-inch. Buy the “slanted ring” style that has a plastic sleeve on the cover. You want the plastic sleeve so you can slide in your cover sheet, and the slanted ring so it’s easy to flip through.
· “Table of Contents” dividers by Avery, color-coded. This style is far superior to the standard dividers where you can only add a word or two. With the color-coded Table of Contents you can make your evidence stand out, and it will be easy for the judge to understand. Notice that I used a printer to fill in the Table of Contents. Make several tests on regular typing paper to ensure you have it aligned correctly before using the enclosed Table of Contents.
· “Exhibits Dividers.” Typically exhibit dividers are numbered, but since the Table of Contents already used numbers, I used letters for the exhibits dividers. They worked just fine.
· You may need glossy photo paper if you will be printing your digital pictures via your color ink jet printer.
Cover Sheet
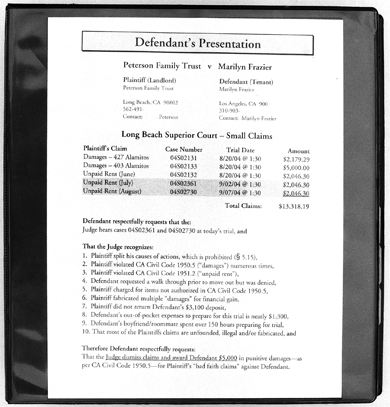
As you can see (above), our cover sheet on the front of the presentation folder was packed with information, primarily because we were defending against five lawsuits at the same time. You’ll probably be dealing with only one lawsuit, and won’t need nearly as much text as we required. With that in mind, on the front cover sheet indicate whether you are the plaintiff or the defendant, identify the other party, and include contact information for both parties as well as the case number. After all that identifying information, summarize your case to the judge as follows:
· How the landlord violated your rights (as defined by law),
· That the landlord fabricated numerous claims for financial gain,
· That your presentation folder will prove this,
· Ask for your deposit back,
· Ask for “bad faith claim” damages as allowed by your state law (in California it is two times the amount of your deposit); and
· End with thanking the judge for making a fair and just decision.
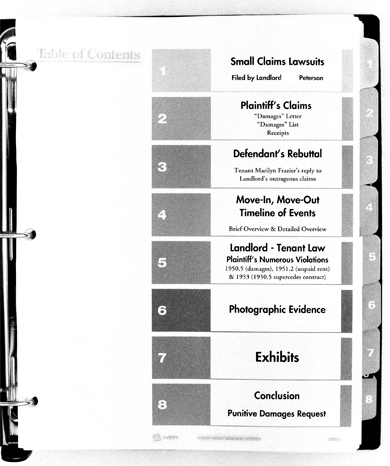
Inside the Binder
I used a very specific order inside of the binder:
· The lawsuit document(s). You are in court because of this document, so it makes sense to have it appear first.
· The landlord’s claims. In our case the landlord was the plaintiff. You can use either “Plaintiff’s Claims” or “Landlord’s Claims,” but be consistent throughout.

· The tenant’s rebuttal letter. In our folder I refer to it as “Defendant’s Rebuttal,” but you can also use “Tenant’s Rebuttal.” For the judge’s copy of the Rebuttal Letter, be sure to add your “exhibit references” next to relevant information. For example, if you say that the kitchen counter wasn’t chipped, and your friend Mary stated the same on your behalf in a letter which is Exhibit C in the folder, then next to that statement in the rebuttal letter you would also include: See EXHIBIT C. Also, I highlighted all of the “See EXHIBIT X” in yellow so the judge could easily see that we had lots of evidence to back up our claims, even if the judge didn’t take the time to look at each exhibit. Psychology, and strategy!
· Move-in, move-out timeline. If you were refused a walk through, or if you broke your lease, you may want to give a quick chronological review of what transpired so the judge has a reference point. We had a huge amount of evidence to present, so we have a long timeline, but yours probably won’t need to be that long.
· Landlord tenant law and the landlord’s numerous violations of it. In addition to the photo evidence, this is one of my favorite sections. I copied the entire landlord tenant law of California civil codes 1950.5, 1951.2 and 1953 and pointed out every time the landlord violated Marilyn’s rights as a tenant. Notice how I shaded my comments so I could quickly grab the judge’s attention. Also notice how I underlined only the most important parts of the law, so the judge wouldn’t have to read everything to get the point. Spoon feeding! Don’t make the judge work…do the work for him. Further, keep your focus specifically on the security deposit law. Don’t go on and on about violations that occurred while you were living in the former apartment; those are probably irrelevant now, unless they are the reason why you are leaving. If they aren’t directly related to the landlord tenant security deposit law, leave them out!
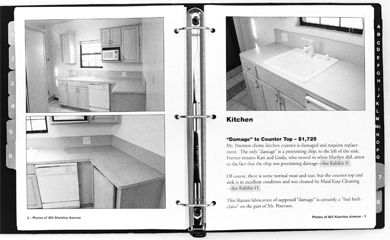
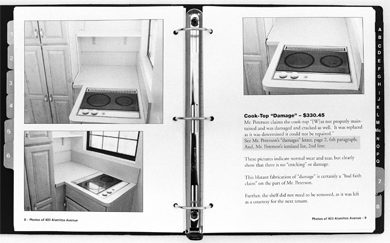
· Photographic Evidence. You would probably think this would come sooner in the binder, but it’s down this far for a reason: argue law first, claims second. Besides, once it is apparent that the landlord violated many of your rights as a tenant, the photo evidence becomes icing on the cake. Of course, there is some strategy to the layout of the photos as well: first, start with the most obvious and outrageous fabrications so the judge immediately realizes your landlord has no credibility. Next to the pictures, state exactly what the landlord’s claim is, where the judge can find the landlord’s claim within the landlord’s list of damages (cite page and paragraph numbers), and conclude with your rebuttal. Also notice in our presentation that the pictures “face” each other, meaning they appear on both sides of the open presentation folder. This is deliberate: more information can be visually processed at the same time, making your claims more believable. Finally, if you can find someone to lay out the pictures in a software program such as Adobe InDesign so you can type text next to the photos and then print the resultant pages onto glossy paper, your presentation will be slick, slick, slick!
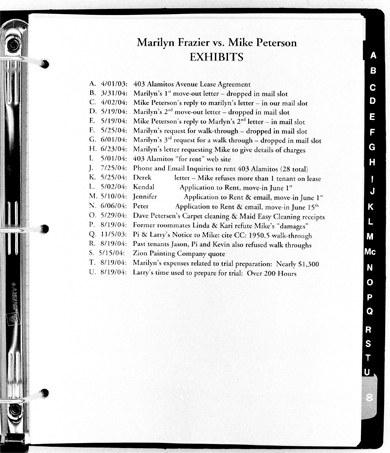
· Exhibits. Notice that I have a Table of Contents for the Exhibits section. This is important — you want the judge to know what the Exhibits section contains. Also, notice I put these in a certain order as well. The lease is first. You may have thought it should appear in the main categories, but in reality, most leases are the same. Besides, generally, you are NOT arguing over the details of the lease, you are arguing which of your rights as a tenant were violated (according to your state’s landlord tenant law), and which of the landlord’s claims are fabricated, neither of which have anything to do with the lease (usually). Check out how I organized the Exhibits, and copy what I did.
· Conclusion. This is where you summarize your case and then ask for your security deposit and “bad faith” damages. Think of it as an expanded version of what’s on your cover sheet. Look at ours to get an idea of what to write.
If you are going to small claims court and therefore representing yourself, remember to make two of these binders: one for you and one for the judge. If you have an attorney involved, especially if you will be going to superior court, then make three binders so that your attorney has one as well.
Since this is your case, take your time and do your very best. Ask for help if you need it. Remember, I put in over 200 hours to ensure Marilyn would win in court. Presentation is everything: our landlord walked in with a large handful of pictures and a bunch of loose papers. Whose presentation do you think got more attention and respect? Marilyn and the landlord only spoke a couple of sentences to the judge for a couple of minutes before he dismissed them — our victory was accomplished through our presentation folder.